Pages

Friday, September 5, 2008

Tablecloth Curtains

To save time and money, I've used sheets or fabric shower curtains to make curtains. But this wasn't going to work as well with our bedroom glass door window. It's really long (about 100" x 100"), so I was having problems finding long enough panels (or enough of the same design) or enough yardage. I even thought about making bicolor panels like ones I saw in an email from West Elm:


But instead I found an easier way...tablecloths!

Photobucket

I was at Target and they had a bunch of nice fabric tablecloths on clearance that were 60" x 120" which should work for my window. The prices were about $9 per tablecloth. This is definitely a better price than the home decor fabrics I was oggling at Joann's this past weekend ($15+/yard...ouch! And that was on sale. I would need about 16 yards!).

Since these tableclothes are long enough and all the edges are already finished, I only needed to make the top casing for the rod and to hem up the bottom. I hemmed the curtains with a few inches of overlap to the floor (to allow for shrinkage that will happen from multiple washings and someone told me that the sun can also shrink them, too). I didn't have to use scissors once. I decided to keep all the length and hem it up...just in case I need to let down a few inches later.

Making the curtains was a lot easier using the tablecloths because of all edges being finished, however, when I was pinning up the top and bottom edges, I noticed that the tablecloths didn't exactly have straight edges. So, that made it harder. But I'm satisfied with the finished product.

Photobucket

Wednesday, August 27, 2008

baby shower planning fun

I've been having some fun planning a shower for my sister-in-law. It's going to be a co-ed shower, but I couldn't resist making it super girly cute (because they are having super cute baby girl!). I'm sure the guys will give over it.

For the invitations, I used Evite for an online option to RSVP. I also made invitations to give out to their friends and family. It was the first time I made an invitation sized to fit a 4" x 6" photo and get it printed 1-hour photo. It worked really well! Despite the frustrations* I've had with the quality of prints from Walgreens, the invitations turned out well.

The invitation (with personal details covered up)

Now that the invitations are done and sent, I can work on decorations, food and party activities! Actually, before making the invitations, I had the urge to make one of those cute diaper cakes I've seen online everywhere. Before starting, I checked out a few tutorials featured on YouTube. If I had more time, I would become a YouTube junkie..you can find a video about ANYTHING there..crazy!

Here's the diaper cake I made. Inside I managed to stuff it with bottles, breastmilk storage bags, and onesies.


*Mini-vent about Walgreens-they have great sales on photo prints, but everytime I get the photos printed I've noticed the colors seem off. This last time 1/2 my photos looked bleached out by the sun or like the settings on their printer were set too bright. The staff was really nice though and tried to print them out again (for free). Still the photos looked off. The only way I'll be able to know if it's Walgreens or my photos is to get them printed elsewhere. Think I'll do that!

Friday, August 22, 2008

homemade baby food

Tyler is now officially eating solids and because it's not only easy, but also really inexpensive, I whipped or pureed up some homemade baby foods. Doesn't take much time or effort. Once I get started, it's actually kinda of fun. I really enjoyed being to make Ava's first foods (beside milk..you know what I mean), so I was excited to do the same for Tyler.

And Tyler really likes all the new tastes:

Eating peas


The other day, I made his veggie purees: peas, green beans and brocoli (although, we'll wait on the brocoli. He's already a gassy baby). No new photos of that since the photos just looked like the ones I took for a post about hiding veggies in Ava's food.

I used frozen mixed fruit (bag contained mango, pineapple, peaches, strawberries, honeydew, grapes) and separated them before making the baby food. For apricots and prunes, I used dried and rehydrated them before pureeing them.


Makes A LOT of food. I didn't use the pineapples, or strawberries, or the grapes for the baby food. He won't be eating those for a few months (just what our pediatrician recommended to wait on due to possible strawberry allergies or his acidity of pineapples). Nothing wrong with grapes..I just snacked them all gone :)

Board


I made this felt board for Ava last night. Actually the board isn't covered with felt. It's actually some type of flannel/fleece textured fabric. Something I bought off the $1/yard table at Walmart a long time ago, but never really used it for anything except the backing to Ava's cheerio bib. You can use felt, flannel or fleece (although fleece has the least amout of "stick-ability"). I like the way this fabric makes the board look like a chalkboard, but is made for felt projects. I didn't have any felt onhand, but found some felt cutouts from a holiday kit set. Now that I know felt will stick to it, I'll get some pieces to make other shapes. I'm also cutting out photos from magazines, cards, and coloring books to laminate. Just adding a piece of felt, sandpaper, or the hook part of velco tape will make it stick. I hope Ava likes the board. I bet she'll end up taking the pieces and toting them around the house until she realizes how fun it is to stick them on the board.


I used a 16 x 20 frame and placed the green fabric over the cardboard back. The frame also came with another piece of cardboard so I put that on the back to cover up the fabric edges. No glue needed. I just used the frame's closures to secure the cardboard back. I also placed the plexiglass (sp?) piece on the backside of the frame. It doubles as a dry erase board. No photo of that side to share.


I still have a huge piece of the green fabric left and might make a wall hanging version to put up in the playroom. I could hang this framed one, but didn't want her to put it down off the wall and drop it on herself. It find a simple wood easel, I'd prefer to use that. For now, she use it on the floor or table (or lap? Might be a little too big). It might be fun for her to have a lapsized version, too. Some much fabic and ideas, so little time!


After making it, I came across this a good link for instructions on Martha Stewart's site.

Monday, July 21, 2008

I'm a little biased

*Couldn't resist the pun*
PhotobucketPhotobucket
My favorite bias tape maker

Photobucket
As requested...a photo of my armhole "guide"...a -purposed greeting card with a "J" shape cutout

Today, I made a little pillowcase dress shirt. I wanted to play around with making my own matching bias tape for the straps. I would have made it a dress, but the scrap fabric was too short, and I figured a shirt would be a change.
I finished the shirt fast..this morning. Must be getting this all down pat. The bias tape took longer. Not because it was hard, but because I was moving slower by this afternoon. Just tired. I'm still recovering from a few crazy nights with Tyler's teething and refusal to take a binky along with Ava's newfound independence and resistance to going to sleep at a decent hour. Ok, back to the shirt...

Thanks to a few of my favorite sewing and quilting books to keep me on track with the bias tape and my trusty bias tape maker (LOVE this notion), I made enough (and a little extra) bias tape for this shirt:
Photobucket
My attempt at an artsy (or etsy) type photo of the shirt

Photobucket
Ava "modeling" the shirt with her new white capris (how long will they be white? we'll see)

Today, during tummy time, I worked on the making the bias tape and adding it to the shirt:
Photobucket

Sunday, July 20, 2008

It fits!

I had Ava try on the dress this morning. She liked the gator side and was excited to put it on, but then she wanted to play in her sandbox. I acquiesced (always wanted to use that word..silly I know) and just took a few shots of her playing in her NEW dress. Some battles aren't worth fighting...

The dress neckhole wasn't too small afterall. I considered removing the ribbon, but with the ribbon, the dress will fit her longer. Actually, the dress is just a little too big (I think) around her bustline right now. But at the rate she's growing, it'll probably fit by the football season.

I'm going to add something to the pink candy stripe side. I think it's too plain. Maybe an applique? I have a cute poodle iron-on, but the tail is a little white puffball...Maybe I can remove it so it wouldn't poke against her chest when she wears the pink gator side of the dress.

Photobucket
Gator dress front

Photobucket
Gator dress side

Photobucket
Gator dress back

Photobucket
Candy Stripe Dress front

Photobucket
Candy Stripe Dress Back (see a little big around her top)

Photobucket
After the photo shoot, she was free to play before getting ready for our day at the beach.

Saturday, July 19, 2008

A sewing jag

I've been in such a mood to sew lately! Not sure exactly how I got on this sewing jag, but think it was due to a really rainy week. Today wasn't a rainy day (well it rained a little), but I had my mind set on making a little dress...without a pattern*. I wanted to make a reversible dress. Without instructions on how to do this, I sat around brainstorming. I finally ended up just giving it a shot and with the help of my seam ripper, I was able to finish it. Not without a few hiccups in the process. I just hope it fits Ava (too late for her to try it on..darn). If not, at least I practiced a few sewing techniques.

Side 1: UF Gator Decor
Photobucket

Side 2: Light Pink "candy stripe" design
Photobucket

Instead of using bias tape, I hemmed the edge and made it look like binding on the Gator dress side. A little tedious, but I like the end result.
Photobucket
The candy stripe edge on the gator side of the dress

Photobucket
This candy stripe side of the dress is just hemmed at the bottom.

When I finally finished, I realized the neck hole seemed small, so I took the straps apart and added ribbon. Depending on how it looks on Ava and/or if the neck hole was really too small, I might do something else. I do like the bows though :)

Photobucket

No outtake photos this time. I was too busy just trying to stay focused on finishing it (making this style dress reversible was trickier than I originally thought). Even after finishing it, I still have a few possible steps if I change the straps. I might also iron-on an applique. We'll see.

*I did use a pattern as reference for the shape/size of the dress, but that's all. The original instructions weren't what I wanted to do, so I had to rely me, myself and I.

Next? I want to make a reversible pillowcase dress. After completing this dress today, the pillowcase dress will be a breeze (crossing fingers). Oh, and I want to make a bunch of little bloomers/panties for the dresses.

Friday, July 18, 2008

Craft apron-from bits & pieces


A 2 tier crayon craft apron sized to fit Ava now and as she grows!

Sticking to my vow to try to use up some of my craft/sewing stash of STUFF, I sat down and made Ava a crayon (and marker, and scissors..whatever fits) apron. I didn't follow a pattern. I scribbled down an idea and went looking for the needed supplies.

Even used a scrap of paper bag to jot down my notes (leftover after duplicating another pattern for a future project)

Then I came across a scrap of fabric cut off from a friend's ring sling (from one of our VERY FUN CT sewing parties). The fabric was so pretty, I couldn't toss the piece. Up until now, I didn't really have an idea what I'd use it for (three of the edges where already finished..maybe a small pillow?). Then I realized it'd be the perfect size for Ava's crayon apron. I used it along with a small green scrap and some velcro tape. Along the way, I made a few detours from the original plan, but it ended up working out. And really very easy to make. It didn't take very long. I was able to do parts of it throughout the morning while taking mini-breaks from cleaning the kitchen, while Ava played quietly and Tyler slept. Sure, I haven't showered YET, but I'm ok with that (I have more cleaning to do anyway).

If/When I make another, maybe I'll make a tutorial. I didn't even check online to see if there's already a good one out there. Bet there is!

Tie on One

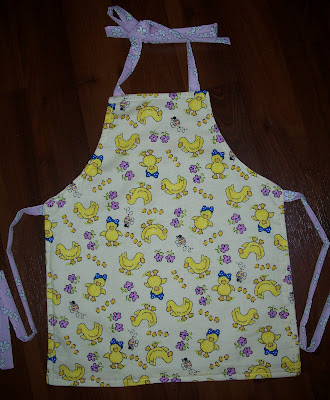
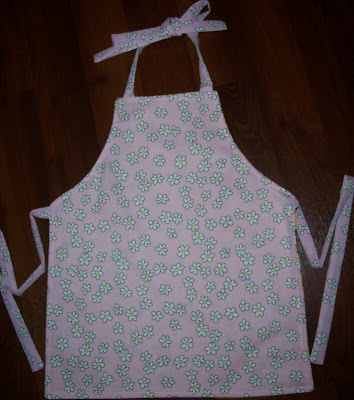
Now that she's starting to do more projects I wanted to make her a cute little apron. I had a pattern, but didn't like the instructions (wanted it to be reversible). So, I used the pattern, cut the extra pieces and sewed it tonight (well actually I cut the pattern/fabric last night while watching Project Runway..inspiration? No, but I thought it was funny to sew and watch the show). I used scrap fabric that I wasn't so attached to (well, the duck fabric I was a little more attached to but decided to "risk" using it for the first attempt at the apron). The apron turned out nice, but the next one I'll make a few changes to. I think the straps could be easy to sew if they weren't so thin. Or I might use wide ribbon. I also want to add pockets and some cute ribbon ruffles, eyelet lace, or rick rack. There are so many options! But I also have to remember that aprons get dirty. If I make one too cute, I might find myself frustrated when Ava gets it stained. What's the point in that?

One side....


The other side....

(photo's blurry..darn..did't notice that until now)


I also cut out an apron my size using the pink-with-white-flowers fabric. Thought Ava might want us to have matching ones. I just don't have enough ducky fabric, so maybe the next one will be matching..we'll see :)

Ok, after chatting with my friend Allison about aprons, she told me about crayon aprons. I didn't really know about these...they are adorable! I'm definitely making (at least) one!

Here's one from Toys R Us, but I really found cute ideas on flickr and Etsy (two of my favorite places for inspiration!)


Rather than use other people's photos (don't want to have to get permissions, etc.), here's the link to the search I did:
http://www.flickr.com/search/?q=crayon%20apron&w=all

http://www.etsy.com/search_results.php?search_type=tag_title&search_query=crayon+apron

Oh, and the best part? I saw a few of the aprons were made using a pillowcase! Cute idea. Except I don't have any cute pillowcases.....


Monday, June 30, 2008

fruity pops

Photobucket

Having so much fun with mom and my sisters. I haven't been crafting, but had the chance to make some yummy fruit smoothie popsicles. I used watermelon, strawberries, pineapple, banana, and milk and they are great for cooling off during these hot summer days. My sisters were totally into posing with their popsicles once I asked.

Photobucket

Saturday, June 7, 2008

Third time's a charm! Dress #3

Today I "re-purposed" a pouch sling I helped a friend make last summer.

Long story short about the sling is that I helped her make it and it ended up not fitting her. So, we swapped slings. I had one I already made that was a little too big for me. If you have ever made/worn a pouch sling, sizing is tricky if you want a good fit. I loved the print of this sling, but never ended up using it with Ava and currently this sling is too small to use for Tyler (I'd like to blame it on him being a chubby baby, but it's actually my fault.). So rather than wait until I lose more weight or trying to alter the sling, I decided to re-purpose it.

Ok, back to what I did with the sling. I made it into a pillow dress for Ava.

Before....
Sling unfolded

I used the 2nd pillowcase dress to determine if the sling would work as a dress

After....
The sling dress..I mean pillowcase dress...you know what I mean :)


You can't see from the photos, but the dress (formerly known as the sling) is lined with turquiose fabric (kind of an eyelet type fabric). The dress isn't reversible due to the center/back seam on the inside of the dress. Too bad, the blue fabric is so cute. After making this dress, I realized it'd be really easy to make a reversible dress. Next time! I also decided to use bias tape for the arms and straps. I thought it looked cute with this print. Made it look sporty. And it was really easier than hemming/finishing the arm's edges.

Each time I make one of these dresses I take in the sides. I didn't mess with the length since the sling's edges were already finished. I didn't want to undo something to redo it.
Here's how it fits on Ava.

Front & Back

I might have to pack this dress in her suitcase for our LA trip next week. Totally a surfer looking dress!

After finishing this dress, I still had enough time to alter dress #2 (and fixed the strap since my cat ATE the ribbon halfway off...she's insane! I was SO mad when I found the dress "eaten").

Wednesday, June 4, 2008

Pillowcase dress Take 2!

Today, I felt inspired to give that pillowcase dress another shot. Not the same one, but to make a new one. No major mistakes this time. I think it's still too big for Ava and might take it in on the sides, but I've made a promise to myself to give all projects a day before I consider tweaking them. I'd be really frustrated to finish it and then turn around and fudge it up.

Ok, here are a few photos of it:


And then on Ava.....getting her to stand still was not going to happen today:
Front

Back


Top/Side (used ribbon sewn to elastic in neckline casing)

length..could be shorter (next time)


side (needs to be taken in..see the extra poof of fabric under her arm):


I really enjoyed making this one. I even finished it during naptime!

Monday, June 2, 2008

Practicing pillowcase dresses

Today I attempted a pillowcase dress. First, I have to give myself a pat on the back for finishing this project. Midway through, I almost stopped, then even after a little tantrum, I pulled myself together and the leftover pieces of my sewing efforts. I was following a two different tutorials while I sewed deciding each step which technique I'd use (probably my first mistake, right?). I decided instead of using the typical method of putting pieces of ribbon into the neckline; I 'd try putting elastic in the neckline and ribbon into the arm holes (via casings). Hmm, this was A LOT harder than I thought it would be. I ended up cutting off the neck of my cute little dress and starting over. At this point, I knew my dress wouldn't be a dress, but probably a shirt if I completed it (great idea, Jody!).


So, I took a second shot at the dress, but this time I didn't follow either tutorial and ended up just figuring it out on my own (seems like I do better this way.) I could write on and on giving you the long version of my rant but here's the reader's digest version. I was frustrated at that I wasn't able to catch myself before chopping off the top of my dress. I could have probably figured out how to fix it, but I was tired of trying to fix it and decided to start over. Before even starting the sewing project, I promised myself no matter what I'd try and if I couldn't salvage the dress, I'd convert it back into a cute pillow (oh by the way, I didn't use a pillowcase. I just used yardage/fabric I had). Anyway, here's my pillowcase dress shirt:


It was late and Ava was in bed, so Elmo agreed to model the shirt. On him, it actually fit as a dress.


Here's the aftermath of my sewing tantrum...I chopped the top right off. Sad thing is...one step before my tantrum, I was actually pretty happy with the outcome of the dress. Then I decided to try making casings in the armholes..I couldn't get it, so out came my scissors. That's what got me in trouble in the first place trying to cut notches in the armholes to sew in casings. I've now learned to keep the scissors away until I have really thought it over and/or try to use my seam ripper.

Here's the dress shirt. I think it'll be too wide for Ava. I don't love the green ribbon, but didn't have any others I liked better (and I ran out of the blue with white dots...it was really wide too):


I might try to take in the sides for more of an A-line..like this (I just folded the extra fabric for this photo).


Even though Ava might not actually be able to wear it, I did learn a lot from this pillowcase project. I'll try making a few more. Maybe not tomorrow, but soon.

Other sewing notes (for those interested in reading about this, but also so I don't forget what/how I did this dress):

I ended up using the recommendation of elastic in the neckline casing (because I was worried the ribbon would have a drawsting effect and pose a strangulation hazard). However, I decided to sew the ribbon onto the elastic before closing the casing. I liked this look bettter than the other tutorial's recommendation of using bias tape to cover the arm holes and to tie into bows. I just didn't think the bias tape bows would be as cute. Easier, but not as cute. I'm still open to trying the bias-tape-as-ribbon method though...

Here's a photo of how I sewed the ribbon to the elastic. Probably easier to do by hand, but I really like my new sewing machine.


This is the ribbon stitched to the end of the elastic:


After stitching the ribbon to the elastic I put it into the casing and stitched it closed (by hand this time).

Oh, one more note (these notes would make sense if/when you read or try the pillowcase tutorial here)...before I made the casing in the neckline, I finished the armholes by turning the raw edges in (actually a really small casing, but too small to fit in ribbon). It's a later step in the tutorial, but I thought that was a lot harder to do once the elastic was already in the casings. Also I realized that if I make the arm holes less of a "J" shape, they'd be easier to do the casing if I wanted to put the ribbon in. But I still think I like the ribbon in the neckline better...

I have to admit that since I had the idea to blog about this project, I was more motivated to finish it-even when I wanted to wad up the fabric and run :)